

Do you ever get tired of constantly seeing your garden tools like seed bags, shovels, and fertilizer bags scattered around your garden? Not only can this be messy, but it can also make it difficult to find the things you need when you need them.
An easy solution to this problem? A garden workbench!
If you have never heard of a work bench for your garden, now is the time to consider making one.
With this DIY project, you will be able to make one for your own garden easily and inexpensively. What’s more is you will never have to worry about losing your tools or storing them inside your house, away from your garden.
Let’s start with our guide on how to build a garden work bench:
Contents
Why You Should Considering Building Your Own Garden Work Bench
Having a workbench in your garden allows easy access to gardening tools making the process of gardening smooth and hassle-free. Gardening should be a relaxing and calming experience. It should not frustrate you as you look for a specific tool all over the garden. A garden workbench can reduce the risk of losing your tools, which makes everything easier and less hectic.
There are a number of benefits that come with building your own garden workbench. The advantages of a DIY garden workbench include:
Light on Your Pocket
DIY projects are (for the most part) cheaper than buying the product. When you work on getting the equipment yourself, you actually end up saving money.
Buying a garden workbench can cost a lot. However, when you build one yourself, you save money because you know what materials are going into building your own garden workbench. Plus, you will be in control when it comes to the budget.
Quality Material
When you build your own garden workbench, you are sure of the exact material that goes into your project. Since you handpick your own tools and equipment, you are sure that the garden workbench will be of high quality.
You do not have to depend on someone else and worry about whether or not they sold you a garden workbench that is of high quality.
Fun and Leisurely
Learning how to do something new is always fun. When you work on building your very own garden workbench, you are exploring something totally new.
You can also get your friends or partners involved during the process. This will not only turn out to be a fun activity for one and all but can also bring you closer to your loved ones.
Plus, at the end of the day, you will not only have fun but you’ll also end up with a new skill in your arsenal.
Storage According to Your Needs
Building your own garden workbench means you can add shelves and storage brackets according to your needs. You will not get the same ease when it comes to ready-to-use benches.
They come with a specific number of brackets that cannot always be modified. When you build your own workbench, you will get exactly what you want.
Tools Needed to Build a Garden Work Bench
If you are ready to start building your own garden workbench, you need to gather all the required tools first. This will save you time.
The tools you need to build your own garden work bench are:
Screwdriver
A screwdriver will be helpful when you get to fitting the screws into various parts of your garden workbench. You need to make sure you have a wide variety of screwdrivers that are of different sizes.
For this purpose, consider the 6 piece screwdriver set by Kutir. The screwdrivers in this set provide a non-slip grip and are magnetic to ensure proper fitting of screws. Plus, you will get all the required sizes, hence you will not have to worry about anything.


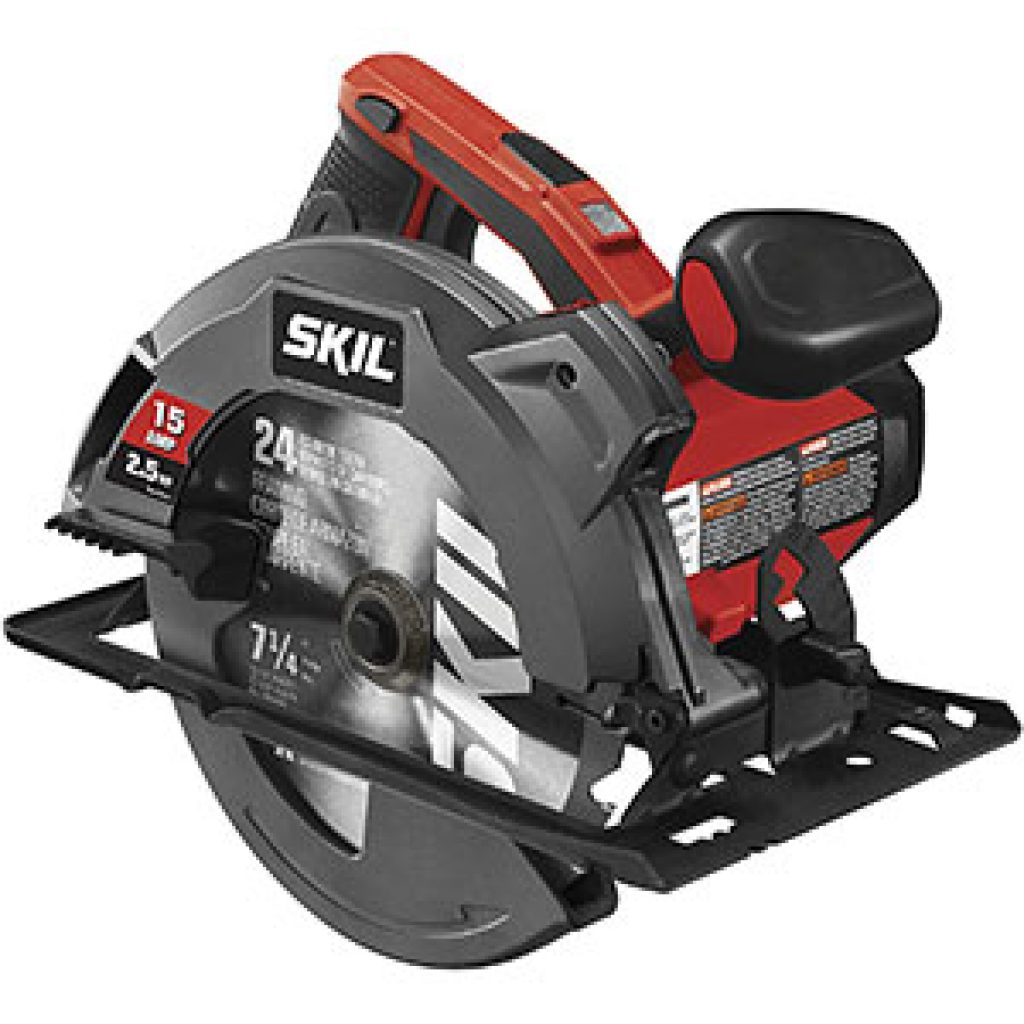
Circular Saw
Another essential tool and perhaps the most important tool to build a garden workbench is a circular saw. It is necessary for cutting pieces of wood to the required size for building your own garden workbench.
A circular saw needs to provide quick and smooth cuts. The circular saw by SKIL is a great option because it is not only cordless, but has a laser fitted inside to make sure you get a straight cut every time. We think it can be a great pick for all kinds of users including beginners who do not know much about DIY projects.

Safety Glasses
The first and most important thing to consider when building your own workbench is your safety. For this reason, you need a pair of safety glasses. Make sure to get a pair that is firm and comfortable to wear since you may have to expect one for an extended period of time.
It will protect your eyes against damage. Wooden particles and dust can enter the eyes and even lead to headaches, hence protection is important.
Consider buying the safety glasses by DEWALT. These glasses have a sturdy grip and are very comfortable to wear.


Measuring Tape
Another essential tool is a measuring tape. You cannot build a garden workbench without knowing the exact measurements of your wooden slabs.
A good measuring tape you can buy is the measuring tape by Kutir. This measuring tape is easy to use with its magnetic hook and measuring metrics on both sides for easy visibility.
With this one, you will not have to ask someone to help you measure wooden pieces.

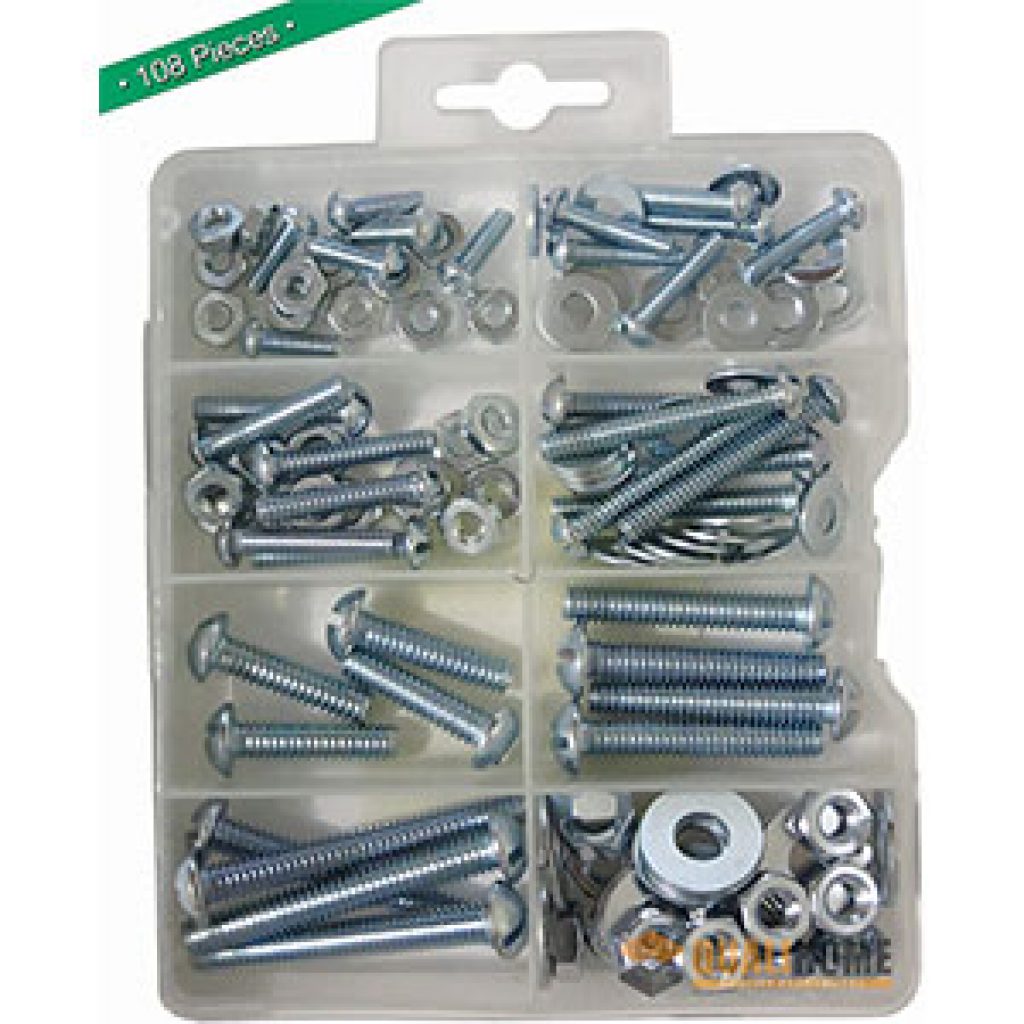
Assortment of Nails and Nuts
You are going to need something to put your garden workbench together. This would require a wide variety of nails and bolts. However, buying each pack of nails would cost a lot.
To save yourself from this hassle, consider the assortment box by Qualihome. This box is ideal and consists of various sizes to fit your needs and requirements. With this by your side, you will not have to worry about buying individual nails and clips.
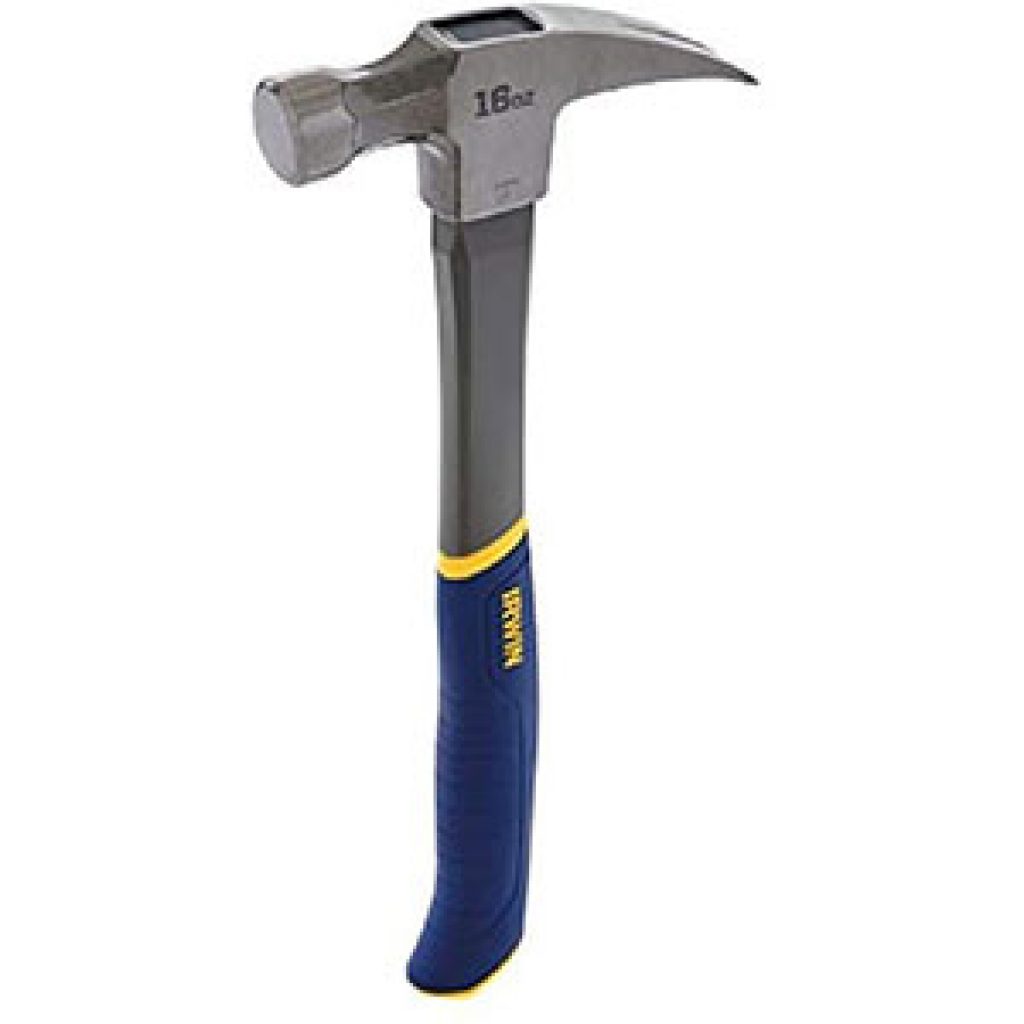
Hammer
A hammer is necessary when building a garden workbench yourself. Without it, you cannot fit nails into their proper place.
You are going to need a hammer that is sturdy and durable. For this, the Fiberglass hammer by IRWIN can be a perfect choice.
This hammer is unique in its build. The fiberglass in it absorbs all sorts of vibrations so you can work with ease.
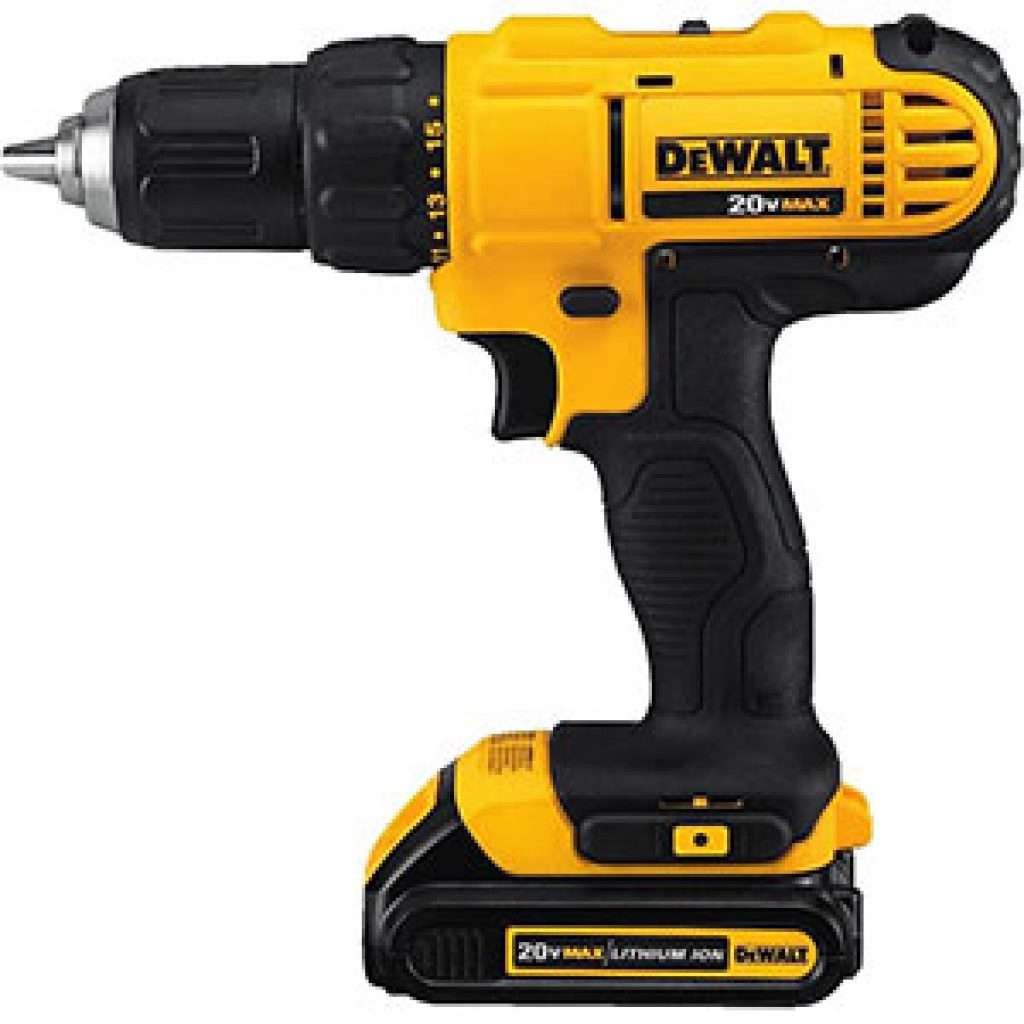
Drill Machine
While building your own garden workbench, you are going to have to drill holes into your wood for inserting screws. Using a drill machine will make this job easier and smoother.
A good drill machine will help you do this. Consider buying the cordless drill by DEWALT
This drill is not only wireless, but it also comes with its own bag for storage.
Unlike most other drills out there, this one offers variable speeds, hence it’s safe and suitable for all kinds of users.
Sandpaper
If you are working with wood, you are going to need something to smooth the edges of whatever you chop or cut. The general purpose sandpaper by 3M can get the job done.

You will get multiple sheets so you can use however many you need for your project and your future DIY projects as well.
This is it, that’s all you will need to build a garden workbench. While some of these tools are cheap, some can be very expensive and can be rented out, however, buying is always a better option.
Consider investing in these if you are serious about DIY projects and this is not going to be a one-off thing.
How to Build a Garden Work Bench – Step by Step Guide
Now that we have gone through all the essential tools that you will need for this DIY project, it is time to get building!

Required Materials
Before you begin, you are going to need the following materials:
- For the frame, you will need 8 pieces of 2×4 wood 241/2”, 4 pieces of 2×4 lumber wood.
This frame will be about 86’’ long.
- For the legs: 2 pieces of lumber wood 2×4 inches about 70 1/2” long.
- For the slats: 10 pieces of lumber wood 2×6 inches.
- For the braces: 2 pieces of 2×4 lumber wood.
- For the back wall: 15 pieces of 1×6 lumber wood.
- For the roof: 1 piece of plywood that is ½’’ in thickness.
You can opt for bigger or smaller planks depending on your requirements.
First Step
The first step involves getting the legs of your garden workbench ready. As mentioned before, these will require wood that is 2×4 inches.
To build the legs, you will need a total of eight pieces of 2X4 at 32” long.
Adjust the size of these legs according to your height or preference.
You will need to cut one side of these legs at 15 degrees. This is for the installation of the roof later on.
Joint two pieces together and you will get one L shaped leg. Repeat the process thrice.
Do not forget to smooth out the edges that you cut.
Second Step
Next, you need to work on the shelves for your garden workbench.
For this step, you need 2 frames from lumber wood that is 2×4. Since the top is 80×36”, the rectangular frames must be 76×32”.
You will need a total of eight pieces (half 76” and half 29”) that will have to be screwed together using the 2½” coarse thread drywall screws. As a result, you will have two rectangles.
You will also need stretchers so cut two more pieces at 29” long across the middle of each rectangle. Consider predrilling holes for ease.
Once the frame has been drilled, attach it to the legs. Lock these two together with the same measurement of screws.
You need to make sure these installed shelves are about 2’’ above the ground and from each other.
The lower frame makes the structure durable and also provides more space to store goods.
Step Three
You are about halfway there already!
Step three involves fitting slats on top of your frames in your garden workbench.
Take your 2×6 slats and fit them on your frames with screws (2 ½’’).
This can be a little complicated. The easiest way to get the job done is to lay the structure on the floor and carefully set the frame.
Make sure you leave no gaps in between the slats and that the frame is right in the center. Moreover, there should be a 2” overhang.
To give your roofing extra protection from water damage, cover it with felting for roofs.
Step Four
Firstly, you can attach trims (1×4) to the front and the back of the bench. These need to be fixed into place by finishing nails measuring 1 ¼’’.
Secondly, if you wish to give your garden workbench a more sturdy structure, you can add extra slats at the back of the bench.
These slats should be secured on top of the roof trims. Attach 1×4 braces to the bottom of these slats before securing.
The slats need to be drilled beforehand and then should be fixed finally with 1½” screws.
Step Five
The final step involves decorating. This can be done according to your preferences.
For some ideas:
- You can use different colors for painting the workbench to give it a more fun look.
- Hang plastic potted plants on the roof with hooks.
- Place all your tools on the back slats. Fix them with brackets. This gives a more organized look.
- Place all your bags of seeds and fertilizers in a neat pile on the bottom rack.
These steps may seem troublesome, but they only involve a couple of screws and good measurements. Test them out to see for yourself!
In the end, be sure to give your garden workbench a finishing layer of ‘Danish Oil’. This protects the wood from any sort of changes that take place over the course of a few years or months. This will make your table more durable.
How to Build a Garden Work Bench – FAQ
Here are answers to some of the most commonly asked questions about building a garden work bench:
- Can anyone build a garden work bench at home?
Yes, that is why we have provided a step by step guide on how to build your own workbench easily. All you need are the right tools and all the materials listed in the guide. It is super easy and fun to make your own garden workbench.
- Are there risks involved in building a garden work bench?
There are a bunch of steps that involve the use of tools that require careful execution. So, caution is necessary for every single step.
If you are careful and use a pair of gloves and safety goggles, you will be able to protect yourself from any harm.
- Will I have to hire pros to help me build a garden work bench?
The advantage of building your own garden workbench is that you can do it all yourself. You do not need any extra workers or helpers to build this workbench. It is a DIY project.
- Where can I buy the tools needed for a workbench?
We have provided links for all the tools required for the DIY garden workbench. However, you are free to search for your own tools on Amazon.
In addition to this, all the material listed for the project can be found at any hardware store near you.
It really is that easy!
- How much does it cost to build a garden work bench?
Let’s face it, a good quality garden workbench that is readY-made will cost you nothing less than $500.
It’s easier to DIY it. Building your own garden workbench will only cost about $50-$200. In addition to this, it’ll be much to decorate your own workbench however you like.
- How long does it take to build a garden work bench?
A super simple garden workbench (like the one we have described) takes no longer than 2 hours to build. That is a pretty good time for something that turns out looking so professional and smooth. However, it can take more if you require a lot of sections or if you have no previous DIY experience.
- How do I plan the height of my garden workbench?
We would recommend you go for a height that best suits you. You can do this by simply measuring your standing height (up to your torso almost) and then using it to cut the legs of your garden workbench accordingly.
- Can I make my garden workbench smaller?
Yes, the size of your workbench depends completely on your choice. A wider bench allows for more space. However, if you wish to make it smaller, cut off some wood – not from the surface!
- What do I fill the gaps in the wood with?
These gaps can be filled with a ‘wood filler’. You can find this at any hardware store. Never use Epoxy to fill these gaps. Wood filler is a much better option for the long term.
- What other finishing layers can I use?
Other than the Danish oil, you can also use a water-based finish. Though, a furniture oil-based finish is more recommended.
- Can I increase the distance between the two shelves?
Of course! This is your DIY project. You can easily increase or decrease the distance between the two shelves to your preference. However, you will need more legs, screws, and support to ensure the structure can handle the load.
- Is it easy to move this garden workbench around?
This depends on the weight and size of the bench. You might need another person to help you if it is too heavy.
- What can I do to make my garden benchtop last longer?
A workbench top can easily last for a few years. Make sure to check for any surfaces that need to be sandpapered or smoothed down. Be careful and keep an eye on splinters while you check.
- Can I add additional shelves to my garden workbench?
The suggested number of shelves is two. This allows for extra space for all the things you need to place. However, if you are sure that you do not require the extra space between the two shelves, then you can easily insert another shelf. Follow the process explained above.
- Is this garden workbench sturdy?
Sturdier than any garden workbench!
The double securing with screws and slats guarantees a structure that will not wiggle around even with the tools and bags you place on it. However, be careful about how much weight you place on the workbench.
How to Build a Garden Work Bench: Conclusion
Garden workbenches can make your life easier. If you spend a lot of time in the garden working on projects then it is a must have for you.
Do not worry about spending dollars on buying one as our guide is written to help you build your own garden workbench. Make sure to follow all the steps and be careful when working on your garden work bench.


- Herb Garden Ideas: Indoor and Outdoor Herb Gardens - March 26, 2025
- How to Make THC Oil in the Simplest Steps Possible - March 26, 2025
- Best CBD Vape Juice, CBD Oils, and E Juice To Meet Your Needs - March 26, 2025