

The agricultural revolution is mostly known for transitioning from subsistence hunting and gathering to food cultivation and animal domestication. But, lest we forget, this term has also contributed largely to the development of modern farming techniques. We have methods like hydroponics that are more effective with better agricultural outcomes. In particular, let’s draw your attention to the dutch bucket system of hydroponics.
Not to worry, such a method doesn’t involve a lot of high-tech inputs or even large-scale implementation. It is equally effective in growing homemade food with minimal creativity, control and maintenance. As we dig into this food-production technique, you will realize agriculture can also be pursued as a hobby with various plants. Here are more details about this system.
Contents
What is a Dutch Bucket?
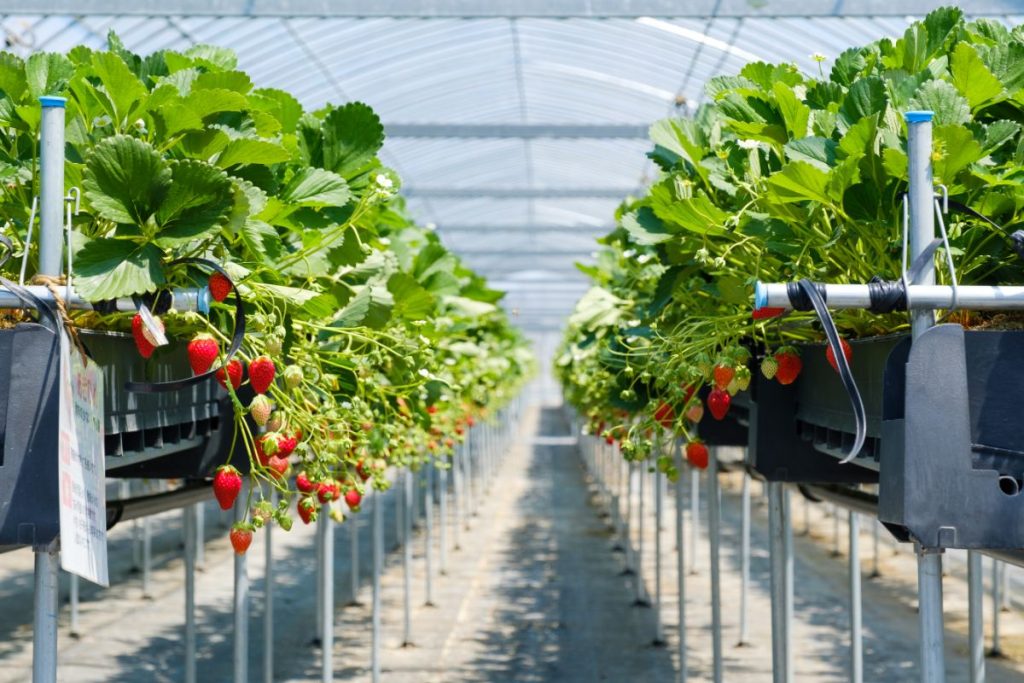
Ideally, a dutch bucket or a Bato bucket system is a type of hydroponic system which involves the connection of multiple growing containers to the same drainage lines and drip irrigation system. In line with this, hydroponics is a horticultural technique of growing plants without soil with the alternative of a nutrient solution in aqueous culture. Also, as the name suggests, this system uses buckets as the support cultivation system. Therefore, you can use one bucket or scale up to include many buckets depending on your growing needs.
Moreover, this technique is highly efficient in nutrients and water adding to its space flexibility. Unlike the traditional ebb and flow method of hydroponics, the dutch bucket systems are different in that nutrients are onto the target plants at regular intervals. Beyond drip-feeding a nutrient solution to plants, this system also involves the training of plants.
How Do the Dutch or Bato Bucket Systems Work?
Primarily, dutch bucket hydroponics revolve around water distribution, drainage and timing. This system doesn’t require a heavy initial investment due to its effectiveness and efficiency. First, you need to set up a bucket system connected and a dedicated reservoir. Then, in the main distributing reservoir, you need to mix enough hydroponic nutrients with water and feed the solution to individual buckets through a drip system.
Furthermore, a water pump circulates water from the reservoir to the buckets through a designated irrigation line with drip emitters above the target buckets. Also, the circulation of the nutrient solution is done based on a watering schedule which differs across different users of this system. Even though it’s unnecessary, some dutch bucket users let the drip run all day. Irrigating your buckets all day is considered a waste of pumping electricity since your plants can only take so much water and nutrients.
Dutch Buckets for Big Crops and Nutrient Hogs
If you are using a grow tent, or you perhaps have an indoor garden, a dutch bucket system is perfect. Why? Because it makes it easy to grow plants that require lots of nutrients separately. Crops that produce fruits and those that are largely saturated will require a lot of nutrients compared to greens. Thus, when both greens and fruiting crops are set up in the same system, this can easily compromise the production levels.
An excellent example of a crop to grow in dutch buckets would be tomatoes. Many commercial hydroponic systems are organized in this manner. Using dutch buckets allows farmers to grow plants that produce high yields and to the farmer’s specific needs. It also makes for an excellent way to use space, especially if you want to grow them indoors.
Variations on Design
1. Drip Schedule
Accordingly, it is recommended that you rinse your plants a few times daily. For instance, you can run your drip for 30 minutes thrice a day. Fortunately, with the help of technology, you can easily achieve this schedule and maximize the intake of plants. Also, you can customize this schedule based on your plant needs, climate and season.
The conventional variation of this system you are likely to encounter is the eight-bucket system. It’s a system that includes a pump, large reservoir, drain lines, etc. Setting up anything larger than the eight-bucket system might require advanced gardening techniques.
For example, plants may start to wilt during the summer, thus requiring more water. You can achieve this by increasing the drip durations or adding more drip sessions within a day. Ideally, go for the drip schedule that suits best the plants you’re growing. With the help of smart plugs, you can have a dutch bucket hydroponic system connected to your phone for automation and easy monitoring.
You can keep the water feedings six hours apart as a good starting point. But then again, even with this standard routine, it goes without saying that if your plants appear scorched and wilting, they need more watering. As such, underwatering is an issue in the dutch bucket hydroponic system more than overwatering. Fortunately, the excess water runs through the drains and back to the main reservoir for redistribution.
Therefore, there are different ways to water plants in the dutch bucket technique with scaling flexibilities. Overwatering isn’t a big issue since excess water runs to the drain line, but pumping electricity might be an issue. Nevertheless, with the knowledge plants can only take up so much, electricity won’t be an issue as long as you feel the plants need more water.
2. Growing Medium (Media)
Also, the absence of soil may leave one wondering how the plant roots and stems are supported. Alternatively, the dutch buckets use perlite or a mixture of hydroton and perlite, among other growing media. Primarily, these are the preferred growing media since they hold water well without causing logging. At all times, a Dutch bucket growing medium should never feel dry.
Feel free to tough your media at different times to check for moisture and wetness. Whenever it feels dry, it’s a call to increase the water circulation. In addition, your cultivation media should also have a balance of excellent drainage to allow for the excess water to drain away. As much as we wish to maintain a continuous supply of water and nutrients, the plants have an optimal level of uptake.
3. Minor Components
A dutch bucket hydroponics system has various components that you have to consider. The key ones include drippers, clamps, tubing, and more. The good thing is that they are readily available in most stores. Remember to get other vital resources, such as buckets or the media type, and ensure you get them from the right sources. The most important decision would be to get the right drainage system.
Operating Drainage Systems in Hydroponic Dutch Bucket System
There are two key ways to operate your drainage: Recirculating and Flow-to-Waste.
1. Flow to Waste Irrigation
It’s a technique that works to remove the solution from the system, and it won’t get recycled. It’s a wasteful technique and is only suitable when you have plants that require calibrated nutrients. The technique used in this process is referred to as nutrient balancing. The technique involves actively balancing the nutrient content of water for the best results. For instance, young plants require lots of nitrogen, while growing fruits require lots of phosphorus.
While products such as fertilizers are designed to suit specific crops, there are still various slight discrepancies in the nutrient ratio, which you have to consider. Thus, a solution can become unbalanced over time, adversely affecting your plant’s growth.
2. Recirculating Irrigation
This approach involves a more conservative approach to managing your dutch bucket system. This system includes buckets watered and set up to drain to a unique return line. Furthermore, the system has a PVC line that sits at a tilt and ensures water does not get back to the reservoir during irrigation.
Farmers that apply this approach can practice nutrient balancing by changing the water after a few days. This process ensures that plants get adequate nutrients and don’t get exposed to waste accumulation.
To achieve the right water balance levels, you may have to perform regular analysis of the water levels. It will help you determine the specific amounts of nutrients in the water.
Once you identify the compromised nutrients, you can adjust them concerning the plants’ needs and the growing stage. The process might involve using specialized water solutions, and it’s often highly complicated. We recommend you use this approach with the correct plant nutritional guide.
The challenge involved in balancing nutrients is why farmers who use this approach have to change the water every few weeks.
What Plants Can You Grow in Dutch Bucket Systems?
The hydroponic system of cultivation is rarely restrictive to what you can grow. This technique can accommodate a wide variety of plants, structure-wise and scalability, unlike a method like the Kratky method. Specifically, this system is ideal for heavy-feeding, large-growing, fruiting and vining crops and herbs. Narrowing down the possibilities, you can plant tomatoes, pepper plants like bell peppers, eggplants, beans, squashes, cucumbers, and even potatoes.
Such vining, fruiting and green-leaf crops are heavy feeders, meaning this system favors them due to the uncompromised supply of nutrients. However, even as the system accommodates a variety of crops, you need to ensure the hydroponic solution is equipped with the proper nutrients for the best outcomes. Also, the horizontal connection of the containers in this system leaves adequate room for vertical growth. Therefore, vining plants or crops are more suitable since you can guide them upwards for more potential yields.
Tomatoes are the most common plants to be grown through this system. In particular, they are preferred since they are the vining type that grows vertically and requires support. Therefore, you need to tie up the vines to train the plants in proper growth and posture. Moreover, the larger the plant, the more or larger drippers you will use for the adequate supply of nutrients.
Once again, your harvest amount isn’t restricted in this system. Also, your plants will grow happy as you conserve water and nutrients since the excess solution is drained into a drainage line that leads back to the main reservoir. Adding to its efficiency, this recirculating system can run unattended for weeks before changing water, thanks to the automated systems.
Plant Support System
As earlier highlighted, this system also provides the flexibility of training plants. However, the vines must be supported overhead for proper growth and maximum output. Accordingly, you can string a clothesline wire overhead for vertical support.
Such a support system also helps distribute the supported plants’ weight load. It can also create a healthy network and self-supporting vines that provide adequate room for healthier leaves and fruits. Therefore, use a support system that suits the crop you are growing in your dutch buckets.
DIY Simple Dutch Bucket Setup
The benefit of dutch bucket systems is that they are exceptionally versatile and simple to construct. As a result, they make up for excellent solutions for your indoor growing regimen. Below is a basic step-by-step guide to shed light on the process.
We also recommend this Youtube Video by Bob Grows on recirculating dutch bucket systems to get you started.
Having understood the dutch bucket technique’s mechanism, you can also implement it commercially in a home garden. To start with, let’s begin with a DIY setup. With a target of an initial low-budget project, let’s start with a system of 6-8 buckets. Next, we will list the materials needed and the step-by-step guide to building the dutch bucket system to make the process easy.
What You Need
Buckets. (One plant per bucket)
Growing media
Bench or floor
Reservoir tank (20-35 gallons)
PVC pipe
Drip emitters
Connections and fittings
Submersible pump
Siphon elbows (one per bucket)
Endcap
Hose clamps
Zip ties
Growing media
Please note that the Dutch bucket system designs vary, and the following guide is a suitable starters’ guide.
Process
Step 1: Find a flat spot on the floor or build benches to create more platforms out of a small space. Cut PVC pipes that run the total length of the setup to act as the drainage line. Ensure it slants to allow the drained water to flow.
Step 2: Proceed to place buckets on both sides of the drainage pipe. The spacing of your buckets will depend on the length of the PVC drainage. In most cases, a foot of separation is often adequate for most plants.
Step 3: Mark the bucket spacing and positions on the drainage line. Then use a drill to cut the holes on top of the drainpipe based on the marks made.
Step 4: Attach a 2-inch PVC elbow at the end of the drainage line, facing down. Place the reservoir directly under the down-facing PVC elbow at the end of the system. If on the ground, you can bury the reservoir, which also helps keep the drip solution cool. Alternatively, benches can help raise your system allowing for reservoir drainage.
Step 5: On the side of each bucket, drill a hole the same size as the hole made on the drainage line in Step 3. Position-wise, drill about 3-inches from the bottom and attach rubber grommets to the holes.
Step 6: Cut equal PVC pipes for connecting to the buckets with elbows. Sand the ends for easy fitting.
Step 7: Attach the connecting PVC pipes to the bottom bucket holes and then fit the PVC elbows at the end of each pipe facing down for drainage to the main drain pipe created in step 1.
Step 8: Place the growing media in the buckets already with your drainage system. You should have placed a reservoir at one end of the drain line with a submersible pump.
Step 9: Finally, you should plant the crop you desire in the buckets and mix the right nutrients in the right proportions with water for recirculating drip solution.
Best Plants for Dutch Bucket Hydroponics System
Tomatoes
Growth Time – 8 to 12 months
Space requirements – 20 25 inches between buckets
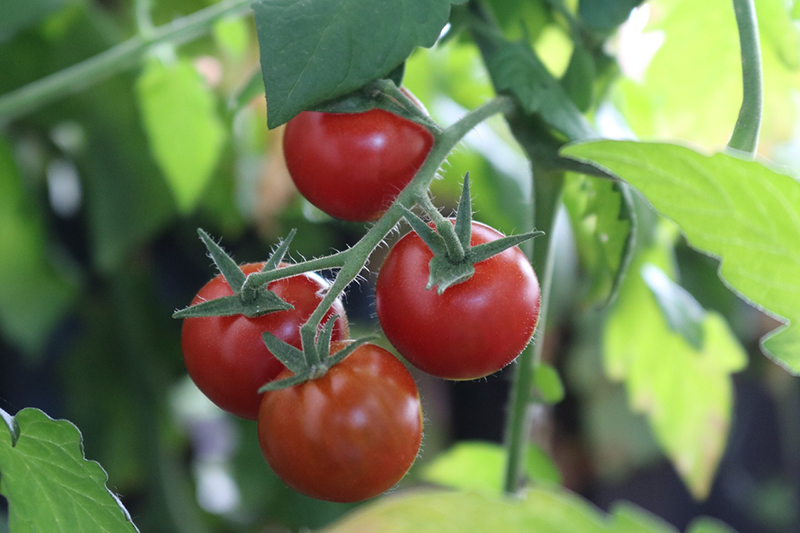

Even if the management of tomatoes involves more tasks than the conventional herb, many farmers prefer it because its consumer demand level is high. In addition, it’s a vining crop, and it can grow to exceptional heights of as much as 30 feet under the right conditions. In these systems, growers implement trellising and lean systems to control the trailing vines in grow tents or greenhouses. With the right management techniques, tomatoes can produce high levels of yield.
According to experts from Crop King, the ideal setup would be to place not more than two plants in each bucket for the best results. It’s an approach that lets you maximize the materials required and avoid over-competition for resources. The main issue with tomatoes is that their quality depends mainly on the growing conditions. Therefore, you may have to ensure the dutch bucket medium has the right balance of nutrients for optimal growth of the tomatoes.
Cucumbers
Growth Time – 3-7months
Space requirements – 24 – 36 inches between buckets
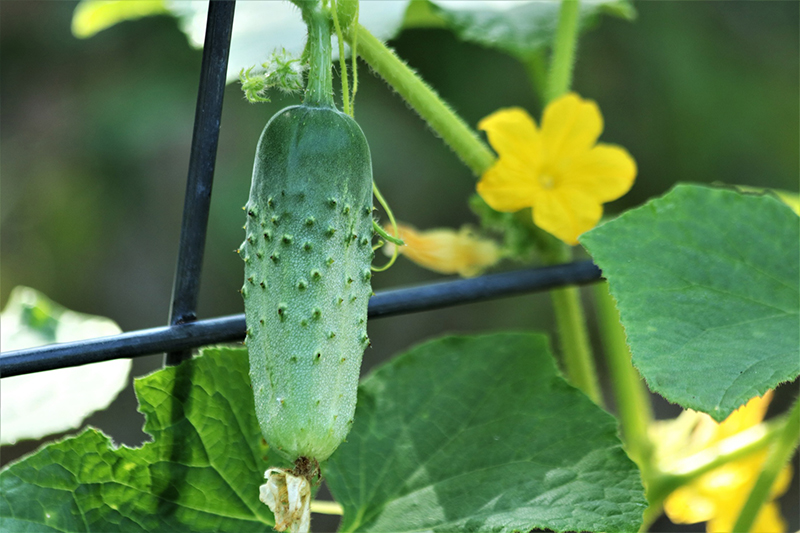
Do you want to produce a fast yield if you have a hardy crop? Try placing cucumbers in your dutch buckets or even a female cucumber plant.
To achieve the best results, you may only have to plant female flowering plants to get flowering fruits with each batch. Thus, you can plant crops without having to perform pollination.
The only challenge associated with virgin cucumbers is that you have to control pollination for the best results. Bees and other insects may easily compromise the pollination process, so you must keep track of this aspect. When purchasing seeds for the system, ensure you choose the correct type for your garden’s best results.
With an average growth time of 3-6 months, cucumbers make it easy to produce the right yield using dutch buckets. Plus, you will also find it easy to control the nutritional regimen of your plants.
Factors for Choosing Bato Crops
Choosing the right crops is a complex process related to your specific gardening needs. Rather than recommending crops without a clear context or approach, below are some key factors to start with:
1) Breeding
Plants “hardy” are more likely to survive in dutch buckets. Plants likely to survive in environments with a short water supply should be a top consideration. While heirloom types are common, studies have shown that hybrids are much more reasonable.
2) Yield
For those who want to grow plants for commercial purposes, ensure you go for a plant that provides the best value for the work. The process might require adequate financial planning and information on aspects such as the yield and market demand.
3) Indeterminacy
It’s a unique term used to refer to how a crop can yield several times, especially in the right environment. Rather than harvest once, it would be good to go for crops that you can harvest many times. If you want to farm indoors, you will have a plant that produces a year-round yield.
4) Disease resistance
Plants clustered together can lead to disease and various plant health complications. On the other hand, if you have a tough plant, you are sure of improved longevity and resistance to disease.
5) Plant Needs and Footprint
Remember that the plants you select for your dutch buckets will influence various secondary factors. These include your space, ease of use, and gardening techniques. Other crucial factors to consider include the height of the ceiling, power needs, media preferences, and more. It would be good if you could manually track down the aspects relating to your grow room space. Bato buckets are excellent for growing plants indoors because they help you save up on space.
Challenges in Picking Crops for your Bato buckets?
The first challenge to consider with dutch buckets is getting the right clients to buy your products. The best way for a farmer to avoid such issues would be to experiment with a basic test to check its functionality. The other major challenge would be using the right techniques to ensure your plants produce the right yield.
You may have to use an informational guide and specific plant details to ensure the best results. However, using the right approach ensures you produce the right yield and plants that can survive to produce several times throughout the year.
A test system allows growers to experiment with different plants and growing conditions that match. For Bato Buckets, a 6-15 bucket system would be ideal to start experimenting with your system.
Pros of the Dutch Bucket System
It saves space for large crops and helps maximize cultivation space
Conservation of excess water and nutrients since they are drained and recirculated afterward.
Unlike other hydroponic systems, it can accommodate different crops, including fruiting and large plants.
Flexible scaling lets you expand your setup as much as you need.
Easy to set up at minimal costs.
It promotes farm orderliness in monitoring output and performance per plant.
It allows for easy plant training.
Reduced supervision, thus less work-intensive.
Improved yields due to optimal supply and uptake of nutrients.
Convenient pest control since an affected bucket can be replaced easily without much interference on the rest of the system.
Cons of the Dutch Bucket System
Due to recirculation, pests and diseases can spread more quickly. Also, when the reservoir is contaminated, diseases and pests can easily spread through the drip system that feeds all the buckets in the affected dutch bucket system.
The system requires regular care and monitoring to ensure it functions optimally. For instance, the drips occasionally block, depriving your plants of water. Therefore, more indulgence is needed for optimal outcomes. Also, you might need to make adjustments or even change or improve the nutrients mixed in the drip solution.
As much as this guide makes the process seem easy, it requires knowledge and experience to get the most out of it. For example, with exposure and knowledge, you will know the right growing media for the dutch buckets and the right crop and the correct drip schedule.
Conclusion
The Dutch Bucket technique is the way to go for modern agriculture. Unlike other hydroponic farming techniques, this system is easy to establish and is equally effective as systems. Nonetheless, the larger you want your Dutch bucket system to be, the most initial costs you will incur due to requiring more materials. You will forever be glad to know about the Dutch bucket system with whichever scale you prefer.
Using the right farming and growers’ techniques is crucial to the results you can get with your projects. In this guide, you have a dutch bucket hydroponics system information to help you set up a suitable garden for your needs. These systems are excellent for growing crops, including cucumbers, peppers, tomatoes, etc. Whether using a stand-alone technique, or a supplementary approach, these solutions are excellent for modern farms.


- Citrine Skin & Lash Spa - April 4, 2025
- Kodiak Fence Company - April 3, 2025
- Auto Plaza Direct - April 3, 2025